

How to Apply a Tourniquet: CAT and SOF Step-by-Step Guide
Quick Navigation
The Role of a Tourniquet and When to Act
Severe bleeding from a limb can become life-threatening in minutes. When an artery is severed, blood loss can reach a fatal volume before emergency services arrive. Knowing how to apply a tourniquet is one of the most directly life-saving skills a civilian, first responder, or outdoor professional can learn. The window for effective action is narrow, and the person nearest to the patient is usually the one who determines the outcome.
Within the M.A.R.C.H. trauma care sequence — Massive hemorrhage, Airway, Respiration, Circulation, Hypothermia — a tourniquet addresses the very first priority: stopping massive hemorrhage on an extremity. A windlass tourniquet is designed to compress the limb tightly enough to occlude arterial blood flow. When applied correctly, it works fast. When applied poorly, it can fail to stop bleeding or cause unnecessary tissue damage. Understanding the application process means understanding both the mechanical steps and the physiological goal they serve.
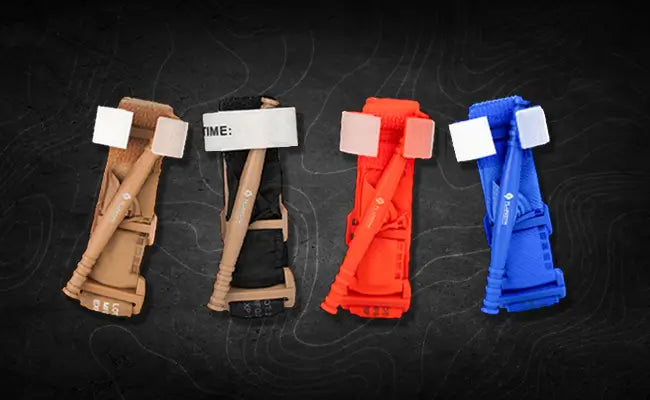
The skill is not just about the physical steps. It is also about recognizing when bleeding is severe enough to warrant intervention, choosing the right device for the situation, and understanding what to do after placement. This guide covers both major civilian windlass tourniquets — the CAT (Combat Application Tourniquet) pattern and the SOF (Special Operations Force) pattern — and walks through each process step by step so that you can build confidence before an emergency forces you to act.
This guide is educational and does not replace medical advice, product instructions, or qualified training. Always call emergency services for serious injuries. Practice with dedicated training devices and within your scope of training.


Pre-Application Check: Do You Need One?
- Before learning how to apply a tourniquet, it is equally important to learn when to use one. A tourniquet is indicated for life-threatening extremity bleeding that cannot be controlled by direct pressure alone.
Signs That Action Is Needed
- · Bright red blood spurting or flowing steadily from a limb wound
- · Blood pooling rapidly on the ground or soaking through clothing in seconds
- · A partial or complete amputation of an arm or leg
- · A wound where direct pressure fails to slow bleeding within 30 seconds
-
When Other Methods Come First
- · Bleeding from the head, neck, or torso (a tourniquet cannot be applied to these areas)
- · Minor cuts controllable with pressure dressing and gauze
- · Suspected internal bleeding (requires immediate emergency transport)
If you are unsure, apply direct pressure first. If bleeding continues aggressively, proceed immediately. The decision tree is simple: if the patient is losing blood faster than you can control with pressure, a tourniquet is the right answer.


How to Apply a Tourniquet: CAT Steps
The CAT is the most widely taught civilian windlass tourniquet. Following the sequence below ensures reliable performance even when stress is high and conditions are poor. The key to CAT application is removing all slack before turning the windlass.
Step-by-Step: CAT Tourniquet
- 1. Place the strap around the limb, 2–3 inches above the wound. Position it high on the thigh or upper arm if the wound is lower. Never place it directly over a joint.
Common mistake: Placing it too low, near the wound itself. This fails to control bleeding from higher vessels. - 2. Pull the strap tight and secure the hook-and-loop closure. Remove all slack so the strap is snug before starting the windlass.
Common mistake: Leaving slack. If you can slide fingers under the band before turning, it is too loose. - 3. Twist the windlass rod. Turn it until bleeding stops. This is the mechanical core of correct placement: you must turn until the limb is compressed hard enough to occlude arterial flow.
Common mistake: Stopping too early because it feels uncomfortable. Bleeding must stop before locking. - 4. Lock the windlass in the clip. Secure the rod so it cannot unwind.
- 5. Write the application time. Use a permanent marker on the strap, the patient's forehead, or a casualty card.
- 6. Check for continued bleeding. If it persists, tighten further or apply a second device side-by-side.
The FlareSyn Tactical Windlass Tourniquet follows the CAT windlass principle and is designed for rapid, one-handed application in high-stress scenarios.
How to Apply a Tourniquet: SOF Steps
Step-by-Step: SOF Tourniquet
- 1. Route the strap around the limb, 2–3 inches above the wound. The SOF has a rigid tip that feeds through the buckle.
Common mistake: Twisting the strap as it routes through the buckle. A flat strap applies pressure evenly. - 2. Pull the strap through the buckle and remove slack. The SOF's sliding buckle allows very tight initial tension before the windlass is used.
Common mistake: Not pulling the free end firmly before starting. - 3. Turn the windlass until bleeding stops. As with the CAT, the goal is complete arterial occlusion.
Common mistake: Stopping when the patient reports pain. Pain is expected; bleeding must stop. - 4. Lock the windlass between the strap and the triangular hook.
- 5. Record the time. Mark the application time clearly.
- 6. Verify bleeding has stopped. If not, tighten more or add a second device.
CAT vs SOF: Key Application Differences
Both devices follow the same physiological principle, but the mechanical details differ. The table below summarizes the practical differences relevant to each device type.
Application Step |
CAT Tourniquet |
SOF Tourniquet |
Strap routing |
Hook-and-loop wrap, no buckle |
Rigid tip feeds through sliding buckle |
Initial tightening |
Pull strap tight, press hook-and-loop |
Pull free end through buckle for leverage |
Windlass lock |
Clip into C-shaped retainer |
Lock under triangular hook with strap |
One-handed application |
Easier due to hook-and-loop closure |
Feasible but needs more practice |
Best suited for |
First-time users, general EDC |
Experienced users, heavy-glove environments |
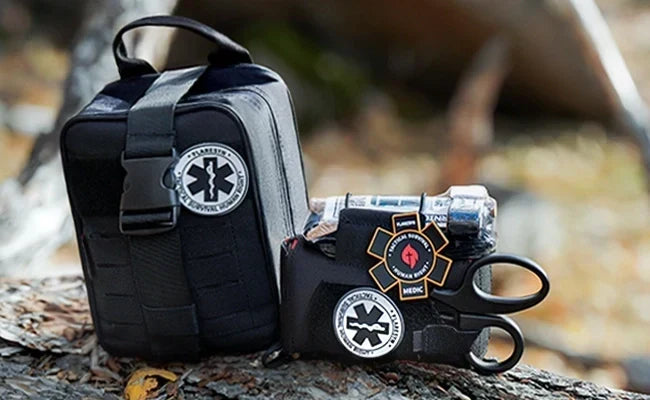
Understanding these differences helps you choose the right device for your context. The FlareSyn Compact Tactical Trauma IFAK includes a tourniquet sleeve compatible with CAT-pattern devices, making it a strong starting point for anyone building the skill of tourniquet deployment as a complete system rather than an isolated mechanical action.
Recording Time and Handoff After Application
Once bleeding is controlled, the next priority is documentation. The placement time is one of the most important pieces of information an emergency physician needs. It affects decisions about limb salvage, ischemia management, and transfusion timing. Knowing proper documentation includes knowing what to write and where to write it.
What to Record
- · The exact time the device was placed (use 24-hour format if possible)
- · The location on the limb where it sits
- · The mechanism of injury, if known
- · Any additional interventions performed such as gauze packing or chest seal placement
Handoff Communication
When EMS or a medical team arrives, tell them:
- · "Tourniquet applied at [time]"
- · Where it is located on the limb
- · Whether a second device was needed
- · Whether bleeding was fully controlled
A backcountry medical kit should include a permanent marker for this purpose. These small details matter when you are building the complete skill of field hemostasis — not just the mechanical step, but the documentation and communication that follow.
Common Mistakes to Avoid
Even people who have studied the steps can make errors under pressure. The most frequent mistakes include:
- · Loose placement: The number one failure. If you have not removed all slack and turned the windlass until bleeding stops, the device is not working.
- · Placing over a joint: The windlass cannot compress a knee or elbow effectively. Move 2–3 inches above the joint toward the torso.
- · Removing the device: Never remove it once applied unless directed by a medical professional. Removing it can cause fatal reperfusion injury.
- · Using a non-medical item: Belts, shoelaces, and ropes do not apply pressure evenly and can damage tissue.
- · Not marking the time: Without an application time, the receiving hospital cannot make informed decisions about limb management.
Training and Practice Recommendations
Reading about tourniquet technique is a start, but real competence comes from hands-on repetition. Build the following into a routine so that the motions become automatic when you need them.
Practice Schedule
- · Apply a training tourniquet to your own leg once a month, timing yourself
- · Practice with a partner to simulate high-stress conditions
- · Use a dedicated training device, never your live tourniquet
- · Rehearse the full sequence: identify bleeding, place device, tighten, lock, mark time, report
A well-maintained FlareSyn tourniquet stays reliable when you need it, but only deliberate practice makes the skill reliable when seconds count. Knowing the technique — and practicing it consistently — is what separates someone who merely carries the gear from someone who can deploy it under fire. Consistent repetition builds the muscle memory that takes over when conscious thought slows down.
The psychological dimension of tourniquet use is rarely discussed but enormously important. Studies of civilian hemorrhage events have shown that bystanders often hesitate to apply a tourniquet because they fear causing harm. This hesitation is the real danger. A tourniquet applied imperfectly is almost always better than no tourniquet at all while waiting for someone more qualified to arrive. Building confidence through practice removes that hesitation and replaces it with decisive action.
Another commonly overlooked factor is environmental readiness. A tourniquet stored in a vehicle glove compartment may be exposed to temperature extremes that degrade the strap material over time. A tourniquet carried in a range bag may accumulate dust and solvent residue. Regular inspection of your stored devices ensures that the windlass still turns smoothly, the strap is not brittle, and the hook-and-loop surface still grips firmly. Environmental degradation is silent — you will not notice it until you deploy the device under pressure.
For those who carry a tourniquet as part of an everyday-carry loadout, positioning matters as much as ownership. A tourniquet buried at the bottom of a backpack is nearly useless in a sudden bleeding emergency. The device should be accessible within seconds, preferably in a dedicated sleeve or outer pocket. The FlareSyn Compact Tactical Trauma IFAK addresses this by placing the tourniquet in an external rapid-deploy sleeve that can be reached without opening the main pouch.
Conclusion
Learning how to apply a tourniquet is a direct investment in life-saving capability. The steps are simple in principle — place, tighten, lock, document, verify — but they require practice and presence of mind to execute under stress. Whether you carry a CAT-pattern or SOF-pattern device, the principles remain identical: occlude arterial flow completely, secure the windlass, and mark the time.
Carry a purpose-built windlass tourniquet. Do not rely on improvised devices. Train with a separate training device so your live tourniquet stays sealed and ready. And when the moment comes, trust the steps you have practiced. The difference between a tourniquet that works and one that fails is often a matter of slack and confidence — both of which rehearsal eliminates. Taking the time to learn this skill properly is one of the most practical safety investments you can make for yourself and the people around you.
Q: Can a tourniquet cause amputation?
A: A properly applied device is designed to save a life. Limb loss is rare when it is applied correctly and the patient reaches definitive care within a reasonable timeframe. Failing to control bleeding is far more dangerous.
Q: How long can a tourniquet stay on?
A: Tourniquets are generally safe for at least two hours, and often longer. The exact risk depends on the injury, the patient, and the environment. Mark the time and get to a hospital as soon as possible.
Q: Should I loosen it periodically to restore blood flow?
A: No. Once applied, do not remove or loosen it unless directed by a medical professional. Releasing it can cause fatal blood loss or dangerous reperfusion injury.
Q: Can I practice with my real tourniquet?
A: Use a dedicated training tourniquet for repeated practice. Repeated use of a live device wears the strap and windlass. Keep your live tourniquet sealed and ready.


Elias.H.Hwang
Elias H. Hwang is a tactical medicine expert and lead contributor at FlareSyn. He specializes in emergency trauma protocols and preparedness education, helping civilians and professionals alike master the tools and skills needed to save lives in critical moments.


Deixar comentário
Este site é protegido por hCaptcha e a Política de privacidade e os Termos de serviço do hCaptcha se aplicam.