

Beyond the Tourniquet: Comprehensive Wound Packing Techniques for Severe Hemorrhage in 2026
Quick Navigation: What You Will Learn
In the world of tactical medicine and emergency preparedness, the windlass tourniquet is widely celebrated as the ultimate lifesaver. From military battlefields to civilian active shooter responses, this single piece of equipment has saved thousands of lives by instantly halting catastrophic extremity hemorrhage. However, focusing exclusively on tourniquet application creates a dangerous gap in your trauma readiness. The reality of severe trauma is messy, unpredictable, and often occurs in anatomical regions where a tourniquet is completely useless. To rely solely on a tourniquet is to leave yourself unprepared for some of the most lethal bleeding scenarios you might face.
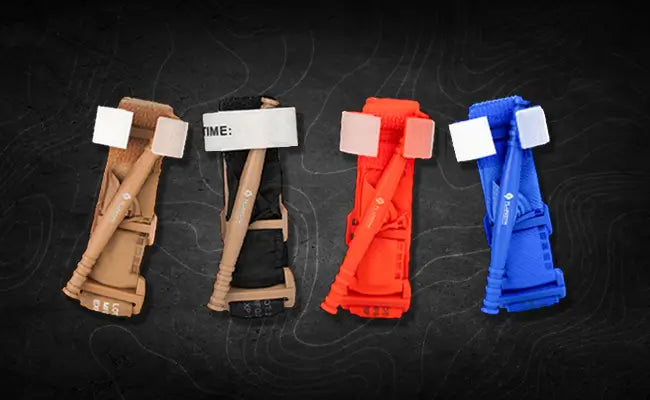
A standard windlass tourniquet, such as the one housed in the rapid-deploy sleeve of your FlareSyn gear, functions by compressing tissue around a single long bone (the humerus or femur) to occlude the underlying major artery against that bone. This mechanical principle requires a circumferential surface to wrap around. Consequently, tourniquets have massive anatomical blind spots. They are fundamentally incapable of stopping hemorrhage that occurs on the torso, abdomen, or the transition points where the limbs join the body. If a severe, penetrating wound occurs just a few inches too high on the thigh or shoulder, a tourniquet cannot achieve the circumferential seal required to compress the vessel, leaving the casualty to bleed out beneath the unapplied strap.


The Physiology of Bleeding: Understanding Massive Hemorrhage and Coagulation
To effectively control a catastrophic bleed, an operator must look past the chaos of the scene and understand the underlying physiological battlefield. Bleeding is not merely a logistical problem of stopping a leak; it is a race against systemic collapse. When a traumatic injury breaches the vascular network, the human body immediately shifts resources to seal the breach. However, when the injury involves deep structural tissue or high-pressure vessels, the body’s internal defenses are quickly overwhelmed, requiring informed external intervention to survive.
Arterial vs. Venous Bleeding in Deep Muscle Tissue
In deep muscle tissue—such as the large muscle groups of the thighs, buttocks, and shoulders—the distinction between arterial and venous damage dictates your immediate medical response. Arterial bleeding represents the highest tier of threat. Because arteries carry oxygenated blood directly from the pumping heart, an arterial breach in deep tissue manifests as high-pressure, rhythmic spurting. The blood is bright red due to high oxygen saturation.
Conversely, venous bleeding originates from vessels returning blood to the heart. It presents as a dark red, steady, and heavy flow. While less explosive than an arterial bleed, deep venous lacerations can be deceptive; trapped beneath thick muscle bellies, blood can pool rapidly into internal cavities, forming massive hematomas that mask the true volume of blood loss until the casualty abruptly crashes into shock.
The Lethal Triad and Its Relation to Blood Loss
When severe hemorrhage is left unchecked, it triggers a cascading systemic failure known in tactical medicine as the Lethal Triad (or Trauma Triad of Death). This self-reinforcing vicious cycle consists of three interconnected pathologies:
Hypothermia: As blood volume drops, the body loses its primary vehicle for heat distribution. The core temperature plummets, which directly impairs the metabolic enzymes required for blood clotting.
Acidosis: Deprived of oxygen-carrying red blood cells, tissues switch from aerobic to anaerobic metabolism, causing a massive buildup of lactic acid. This acidic environment further destroys the structural integrity of necessary clotting proteins.
Coagulopathy: The combination of cold temperatures and high acidity completely halts the body’s ability to form stable blood clots, leading to uncontrollable bleeding even from minor capillary beds.
Once a casualty enters the Lethal Triad, survival rates drop exponentially. Managing blood loss immediately via external pressure is the only way to prevent this cascade from initiating.
How Mechanical Pressure Triggers the Coagulation Cascade
Wound packing works because it directly interfaces with the body's natural coagulation cascade. When you pack gauze tightly into a wound cavity, you are not just plugging a hole; you are applying targeted mechanical pressure directly to the wall of the ruptured vessel.
This localized pressure accomplishes two critical things: it slows the velocity of the exiting blood, and it forces the damaged vascular walls against each other. By arresting the high-velocity flow, you allow blood to pool statically behind your packing site. This stagnation is the precise trigger the body needs to initiate its clotting cascade—allowing platelets to aggregate, adhere to the exposed collagen of the vascular wall, and spin a dense web of fibrin to seal the breach permanently.
Bleeding Assessment Matrix
In high-stress emergency environments, you must rapidly categorize the type of bleeding to deploy the correct tool from your IFAK. Use this matrix for immediate field triage:
| Bleeding Type | Flow Characteristics | Blood Color | Pressure Level | Immediate Threat Tier |
| Arterial | Pulsating, rhythmic spurting synchronized with heartbeat | Bright, vibrant scarlet red | High pressure; can bypass initial surface pressure | Tier 1 (Extreme) - Fatal within seconds to minutes if untreated |
| Venous | Steady, continuous, heavy flowing or pooling | Dark, deep maroon red | Low to medium pressure; flows consistently | Tier 2 (High) - Highly dangerous; leads to insidious hypovolemic shock |
| Capillary | Slow oozing, weeping, or trickling from surface | Normal red / brick red | Negligible pressure; self-limiting | Tier 3 (Low) - Non-life-threatening; easily managed with basic gauze |
The Science of Hemostatic Agents: Chitosan vs. Kaolin vs. Standard Gauze
When dealing with a catastrophic junctional bleed, the material you pack into the wound cavity determines how fast you can arrest the flow of blood. While standard cotton gauze relies entirely on your manual pressure to slow blood flow down enough for the body’s natural clotting factors to work, modern hemostatic gauzes are engineered with active biomaterials. These agents fundamentally alter the chemical and physical landscape inside the wound track, forcing coagulation to occur at an accelerated rate even when the casualty's internal systems are failing.
How Modern Hemostatic Gauze Accelerates Clotting
Modern hemostatic agents utilize two distinct biological pathways to accelerate clot formation: chemical activation and mucoadhesive bonding.
Chemical activation relies on mineral components to jumpstart the body's intrinsic coagulation pathway. When these minerals contact blood, they instantly activate Factor XII, a crucial protein that sets off a rapid chain reaction, forcing the body to produce fibrin chains much faster than normal.
Conversely, mucoadhesive mechanisms work completely independently of the body's natural clotting cascade. These agents carry a strong positive charge. Because red blood cells naturally carry a negative charge, the hemostatic agent acts like a microscopic magnet, attracting and cross-linking red blood cells upon contact. This creates a thick, artificial, localized mechanical plug over the vascular breach without needing to trigger internal chemical cascades.
Chitosan-Based Gauze vs. Kaolin-Based Gauze
The tactical medical industry is primary divided between two advanced hemostatic technologies: Chitosan and Kaolin.
Chitosan-Based Gauze (e.g., Celox / FlareSyn Advanced Modules): Derived from the chitin found in crustacean shells, chitosan operates via the mucoadhesive mechanism. Because it binds directly to red blood cells independently of clotting factors, it is exceptionally effective in extreme tactical environments. If a casualty is hypothermic or has lost significant blood, their natural clotting proteins are compromised, but chitosan will still form a resilient, sticky clot regardless of body temperature or blood chemistry.
Kaolin-Based Gauze (e.g., QuikClot): Engineered using a naturally occurring clay mineral called kaolin, this technology relies on chemical activation. Kaolin triggers the body's own clotting factors to accelerate coagulation. While highly effective in a stable patient, its efficacy can drop if the casualty has progressed into advanced coagulopathy, as it requires functional internal proteins to complete the clot.
Why Standard Compressed Gauze Alone Requires Longer Compression Times
Standard compressed cotton gauze contains no active chemical additives or mucoadhesive agents. It functions purely as a structural matrix. When you pack standard gauze into a wound, you are relying entirely on the physical displacement of space to compress the torn artery and slow the hemorrhage down to a halt.
Because it lacks any biological accelerators, standard gauze requires a minimum of 3 to 5 minutes of continuous, high-pressure manual compression to allow the body to independently spin a stable fibrin network. In a high-stress tactical environment or an active threat scenario, maintaining uninterrupted, maximum-effort manual pressure for five full minutes is an eternity—exhausting the rescuer and delaying tactical movement or the treatment of secondary injuries. Advanced hemostatics reduce this critical compression window down to as little as 60 seconds.
| Dimension | Standard Compressed Gauze | Kaolin-Based Gauze (QuikClot) | Chitosan-Based Gauze (FlareSyn Advanced) |
| Mechanism of Action | Pure mechanical volume displacement & blood absorption | Chemical activation of the body's intrinsic clotting factor (Factor XII) | Mucoadhesive bonding; electrostatically binds negative red blood cells |
| Required Manual Compression | 3 to 5 minutes of continuous, maximum manual pressure | 3 minutes of focused manual pressure | 1 to 3 minutes (Highly accelerated plug formation) |
| Efficacy in Hypothermic Patients | Low; fails when cold temperatures halt natural clotting enzymes | Moderate; performance drops if internal clotting factors fail | Excellent; works completely independently of blood temperature or clotting factors |
| Average Shelf Life | 4 to 5 years (Highly resilient to environmental factors) | 3 to 5 years | 3 to 5 years |
| Ideal Wound Type | Minor to moderate lacerations; secondary backing gauze | Deep, packing-accessible arterial wounds in normothermic casualties | Catastrophic junctional bleeds, blast trauma, and advanced hypovolemic shock cases |
Tactical Step-by-Step Guide: How to Pack a Wound Correctly
Wound packing is a high-stakes, tactile procedure that must be performed with aggressive precision. In a severe junctional hemorrhage, the wound cavity will quickly fill with pooling blood, completely obscuring your vision. You cannot successfully pack a wound by simply stuffing gauze into the general opening. You must rely on physical touch, structural landmarks, and a disciplined mechanical technique to deliver the hemostatic agent precisely where it can arrest the arterial flow.
Identifying the Core of the Bleed (The "Hot Spot")
The first and most critical objective is identifying the source of the hemorrhage, clinically referred to as the "Hot Spot." This is the precise point where the structural wall of the major artery has been breached.
To find it, you must insert your index or middle finger directly into the wet wound cavity, pushing through the pooled blood until you feel the rhythmic, high-pressure jet of blood striking your fingertip. This is the blind-manipulation core. If you apply pressure anywhere else inside the wound track, the artery will continue to bleed underneath your packing, filling the surrounding tissue and leading to silent, fatal internal hemorrhaging. Your finger must remain pinned directly against this hot spot until the gauze takes its place.
The "Finger Anchor" Technique and Continuous Feeding
Once your finger has isolated the hot spot, you initiate the Finger Anchor technique. This mechanical sequence ensures that pressure is never lifted from the breached vessel during the packing process.
Using your other hand, take the leading edge of your FlareSyn compressed gauze and bunch it into a small, tight ball. Feed this initial wedge down the track of your anchoring finger until it sits directly between your fingertip and the arterial tear. Now, swap roles: use your opposite finger to press the gauze down, locking it in place, while withdrawing your first finger just enough to grab the next segment of gauze. This constant, alternating hand-over-hand cadence ensures uninterrupted compression against the vascular wall.
Achieving Maximum Density (Packing to the Bone)
A common point of failure for novice operators is packing the superficial layers of the skin while leaving empty space at the bottom of the wound cavity. To prevent this, you must pack with the intent of crushing the gauze against solid anatomical structures—ideally, packing directly to the bone.
Every downward push of your finger must maximize structural density. You must pack the gauze tightly into every lateral recess and pocket of the torn muscle tissue. The goal is to build a hard, structural column of packed material from the bone all the way to the surface of the skin. This high-density architecture physically occludes the vessel and prevents blood from finding an alternate path around your packing matrix.
Post-Packing Compression and Re-assessment
After the wound cavity is completely packed to the point where no more gauze can physically fit, the procedure transitions to the critical phase of post-packing manual compression. Do not simply let go. You must lock your elbows, lean your body weight directly over the wound, and maintain maximum downward structural pressure.
If you are using an advanced chitosan-based hemostatic gauze, you must maintain this constant pressure for at least 1 to 3 minutes to allow the mucoadhesive barrier to fuse. For standard gauze, this must be held for a full 5 minutes. Once the time has elapsed, slowly ease your hands away while carefully monitoring the surface for any bright red blood weeping through.
Common Pitfalls and "Silent Failures" in Wound Packing
In high-stress emergency medical scenarios, high adrenaline can lead to a false sense of security. An operator may look at a wound, see that the bleeding has stopped at the surface, and assume the intervention was a success. However, wound packing is highly vulnerable to "silent failures"—technical errors that look correct from the outside but fail internally, allowing catastrophic hemorrhaging to continue beneath the surface until the casualty suddenly slips into irreversible shock.
Mistake 1: Packing the Skin, Not the Wound Cavity (The "Iceberg" Illusion)
The most common tactical error made by under-trained individuals is creating what instructors call the "Iceberg Illusion." This occurs when an operator balls up a large amount of gauze and shoves it into the outer opening of the wound, completely sealing the skin over the injury.
Because the skin opening is plugged, outward bleeding stops, giving the illusion of control. However, beneath the skin, the deep wound cavity remains completely empty. The severed artery continues to pump blood at high pressure into this vacant space, expanding the internal cavity and tearing through deep tissue layers. This hidden pooling of blood rapidly depletes the casualty’s systemic volume while masking the failure from the rescuer's eyes.
Mistake 2: Prematurely Removing Pressure Before Coagulation
The physical bonding of a hemostatic agent or the natural spinning of a fibrin network requires uninterrupted mechanical stillness. A frequent mistake in dynamic tactical settings is relaxing or removing manual pressure too early.
Operators often apply pressure for 30 seconds, hear an explosion or a shout, and momentarily lift their hands to check the wound or look around. The moment that downward mechanical force is dropped, the internal arterial pressure surges, instantly tearing apart the fragile, newly formed microscopic platelets. Lifting your hands even once effectively resets the coagulation clock to zero, forcing you to begin the entire compression timeline over again.
Mistake 3: Blind Packing Without Sweeping for Bone Fragments
When penetrating trauma is caused by high-velocity shrapnel, ballistic rounds, or severe crushing forces, the impact routinely shatters underlying bones, such as the femur or pelvis. This leaves the internal wound track lined with razor-sharp, jagged bone splinters.
If an operator drives their fingers blindly and forcefully into the cavity without a quick, careful initial sweep, two catastrophic failures occur: First, the sharp fragments can easily slice through the responder's nitrile gloves, exposing them to bloodborne pathogens and taking them out of the fight. Second, the blunt force of pushing gauze against loose bone splinters can drive those fragments deeper into surrounding healthy tissue, inadvertently severing adjacent intact blood vessels and compounding the severity of the hemorrhage.
The Absolute Contraindications of Hemorrhage Control
To maximize casualty survival rates under extreme stress, memorize this list of absolute contraindications during junctional trauma management:
NEVER substitute a pressure dressing for manual compression early on: Wrapping an elastic bandage over a loosely packed wound before holding manual pressure will fail. A superficial dressing cannot generate the targeted, internal depth-pressure required to close a ruptured artery.
NEVER pack wounds located on the chest or abdomen: Wound packing is strictly limited to junctional zones and extremities. Packing the thoracic or abdominal cavities is completely ineffective because these areas are massive, open spaces without underlying bones to compress the blood vessels against.
NEVER reuse a dropped or contaminated roll of gauze: If a compressed gauze roll falls out of your hands onto mud, blood, or debris during a chaotic application, discard it immediately and deploy a fresh vacuum-sealed module. Shoving heavily contaminated material deep into an arterial breach introduces systemic bacteria, guaranteeing severe sepsis if the casualty survives the initial hemorrhage.
NEVER pull out old gauze if bleeding recurs through the packing: If you complete your manual compression and notice bright red blood continuously soaking through the gauze column, do not pull the existing gauze out. Removing it will tear away whatever internal clots have started to form. Instead, pack a second roll of gauze directly on top of the first, packing aggressively into any remaining lateral voids.
Integrating Advanced Trauma Gear: Building Your 2026 IFAK Setup
Mastering the mechanics of wound packing is only half the equation; the final, decisive factor is the layout and capability of your gear. In a severe junctional hemorrhage, where survival is measured in seconds, your equipment cannot be a bottleneck. A poorly organized kit or sub-standard medical components will directly sabotage your ability to apply life-saving techniques, rendering your training useless. True trauma readiness requires a deliberate integration of specialized medical tools engineered specifically to match the brutal timeline of catastrophic bleeding.
Why Compressed Gauze and Hemostatic Agents Must Be Instantly Accessible
When an arterial breach is pooling blood into a junctional zone, your hands must move on pure muscle memory. You cannot afford to dig through zippered pockets, untangle miscellaneous medical supplies, or struggle with tough, non-tear plastic packaging.
Every second spent fumbling with a kit allows hundreds of milliliters of blood to escape the circulatory system. This is why advanced hemostatic agents and compressed gauze must occupy the most accessible, high-visibility layout within your kit. They should be stored in dedicated, rapid-deploy compartments—such as the pull-out medical sleds found in professional trauma platforms—ensuring that a vacuum-sealed roll of gauze can be deployed, ripped open, and driven into the wound track within a single, continuous movement.
Q1: Can I use regular cotton gauze if I do not have advanced hemostatic gauze?
A: Yes, you can. While advanced hemostatic agents (like Chitosan or Kaolin) are highly preferred because they chemically or electrostatically accelerate clotting, standard compressed cotton gauze is still a powerful mechanical tool. If you are using regular gauze, the fundamental mechanics of the wound packing techniques remain identical: you must pack dense columns directly to the bone. However, because it lacks active clotting co-factors, you must maintain uninterrupted manual compression for a full 5 minutes instead of the 1 to 3 minutes required by hemostatic alternatives.
Q2: How do I know when to stop packing a wound cavity?
A: You should stop packing when the wound cavity is completely full and cannot physically accept any more material. The packed gauze should form a tight, solid structural mass that sits slightly proud of—or level with—the surrounding skin surface. If there is still space inside the tissue tracks, blood will continue to pool internally. Pack until the cavity is packed to its absolute physical limits, then immediately transition to holding direct external body-weight pressure.
Q3: Is it safe to pack a deep wound if I suspect there are foreign objects like shrapnel or bullets inside?
A: In a life-threatening, catastrophic hemorrhage scenario, stopping the bleed always takes priority over preventing infection or managing secondary internal tissue damage. If shrapnel or bullet fragments are inside, do not waste time trying to locate or fish them out. Do a rapid initial sweep to ensure there are no jagged bone shards that could cut your fingers, and then proceed to pack the gauze directly over the foreign objects. Hospital trauma surgeons will clean and debride the wound tract during definitive surgery; your sole mission in the field is to prevent the casualty from bleeding out.
Q4: Should I ever remove the gauze to check if the bleeding has stopped?
A: Absolutely not. Never peek under the packing or pull out the initial layers of gauze once they have been driven into the cavity. The first wedge of gauze placed against the "hot spot" anchors the microscopic blood clots forming at the arterial breach. Pulling that gauze out destroys that fragile physical seal and resets the biological clotting clock to zero. If you finish packing and notice bright red blood continuously saturating the dressing, leave the original packing in place, grab a secondary roll of compressed gauze, and pack it aggressively on top of the first setup to fill any remaining internal gaps.


Elias.H.Hwang
Elias H. Hwang is a tactical medicine expert and lead contributor at FlareSyn. He specializes in emergency trauma protocols and preparedness education, helping civilians and professionals alike master the tools and skills needed to save lives in critical moments.


Deixar comentário
Este site é protegido por hCaptcha e a Política de privacidade e os Termos de serviço do hCaptcha se aplicam.