Bleed Control Essentials for Hikers & Backpackers
When a fall becomes a serious bleeding event on trail
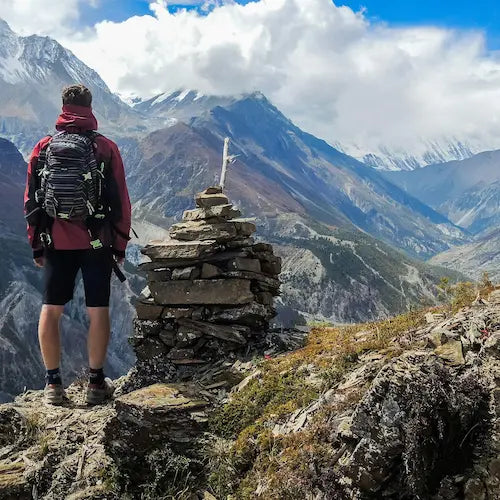
A bleed control kit for hiking can be the decisive factor between minor injury management and life-threatening trauma when accidents occur in remote terrain. Hikers often underestimate speed and severity of bleeding, especially when far from medical aid. In outdoor settings, even seemingly small wounds can escalate due to delayed evacuation and rugged conditions. To reduce risks, bleed control kit for hiking users must understand injury patterns, response timing, and bleeding severity indicators. Always assume that a fall may cause internal trauma, deep lacerations, or arterial bleeding, and ensure your bleed control kit for hiking is quickly accessible. Having a bleed control kit for hiking ready at hand—not buried at the bottom of a pack—is fundamental for survival in wilderness emergencies.
Common trail injuries and quick response priorities
The most frequent trauma cases include lacerations from sharp rocks or branches, joint injuries leading to fractures, and thigh or arm punctures caused by trekking poles or falls. In each scenario, bleed control kit for hiking owners should prioritize:
-
Immediate access to tourniquet (within 30 seconds)
-
Direct pressure application
-
Sealing wounds using hemostatic gauze
-
Preventing contamination
Because response speed determines survival, packers of a bleed control kit for hiking must rehearse one-handed application techniques. Every 100 steps, you move further from medical support; losing just 2–3 minutes after a fall may result in rapid blood loss. Try to respond within the “Golden 60 seconds,” especially for arterial bleeds. Boldly practice using a bleed control kit for hiking before trips to avoid hesitation. Ensure at least one hiking partner carries compatible gear to reduce repair time.
Time and evacuation realities for backcountry incidents
Backcountry evacuations often exceed 45–90 minutes. In remote mountain regions, rescue teams’ response time may stretch beyond 2 hours due to elevation, weather, or restricted access. This makes bleed control kit for hiking preparedness essential. During prolonged evacuation, hikers may need to reapply pressure dressings or replace soaked gauze. Proper bleeding control methods include:
-
Reapplication of pressure dressings after 10–15 minutes
-
Using windlass-style tourniquets for major limb hemorrhages
-
Elevation, immobilization, and wound reassessment every 5 minutes
When using a bleed control kit for hiking, hikers should track time from injury to first intervention and communicate it to rescuers. In rare cases, self-evacuation while controlling bleeding is necessary; training to use a bleed control kit for hiking one-handed is therefore vital. Maintaining proficiency with a bleed control kit for hiking ensures you’re prepared when adrenaline or shock affects decision-making.
Because terrain may delay rescuers, hikers must anticipate equipment failure and pack redundant supplies. Each member of a group should carry at least partial bleeding control capabilities. Limiting dependency on a single bleed control kit for hiking improves overall survival chances. Pack for the worst-case timing: no rescue for three hours. Bleed control kit for hiking selection should focus on rapid use, durability, and moisture resistance. Place it within arm’s reach for instant deployment in steep, unstable terrain.

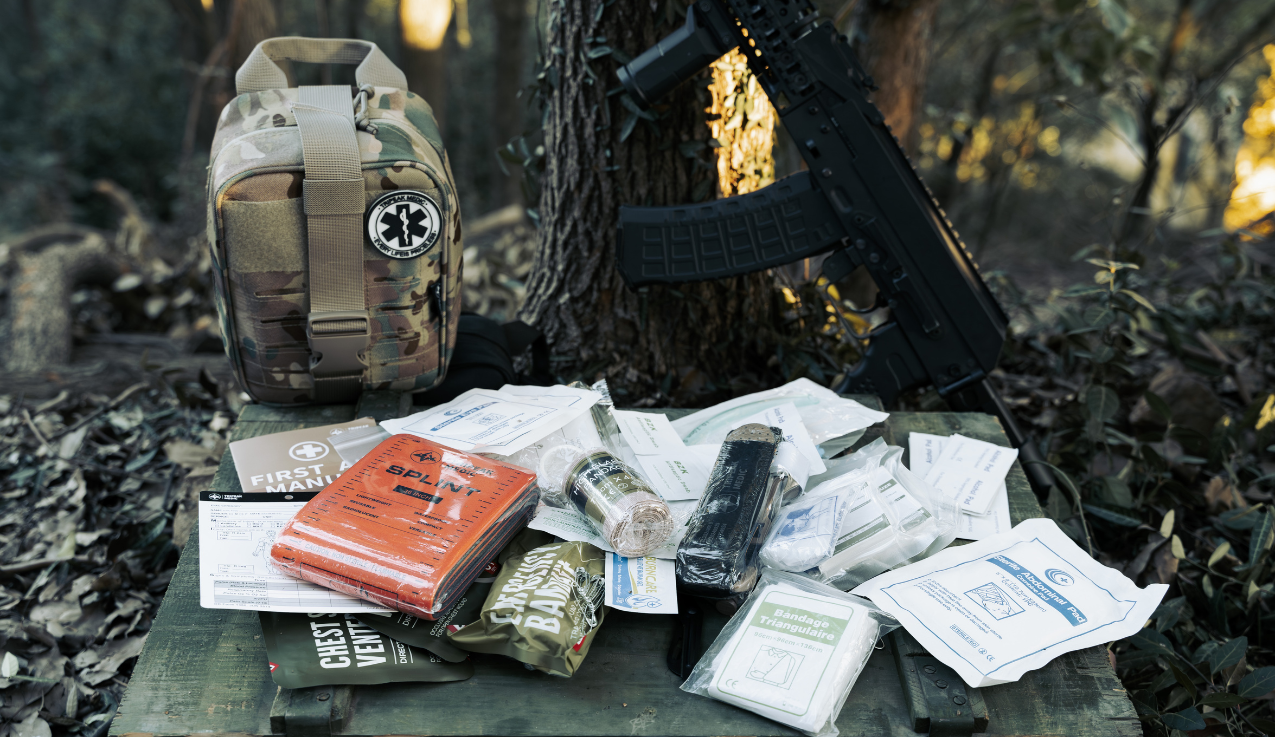
Core bleed control items for any pack
Carrying a bleed control kit for hiking is not just a safety measure—it is a fundamental part of responsible outdoor preparation. Whether hiking alone or with a group, core trauma items must be lightweight, compact, and rapidly accessible. A properly configured bleed control kit for hiking should follow two principles: immediate one-hand accessibility and redundancy for critical components. Aim for a kit deployment speed of under 30 seconds.
A standard bleed control kit for hiking should include:
-
At least one windlass-style tourniquet
-
Hemostatic gauze with proven clotting agents
-
Pressure dressings (vacuum-sealed if possible)
-
Wound closure strips or butterfly bandages
-
Nitrile gloves and trauma shears
-
Emergency blanket for shock management
To maintain SEO effectiveness and improve emergency efficiency, hikers should place the bleed control kit for hiking in an exterior pocket or on a MOLLE-compatible attachment. Every component should withstand moisture, dirt infiltration, and extreme temperature fluctuation. Practice retrieval and re-packing to ensure muscle memory. Mastering the use of your bleed control kit for hiking boosts confidence and response time, especially under stress.
Always have your bleed control kit for hiking positioned for instant deployment.
Tourniquet options and how to carry them on a pack strap
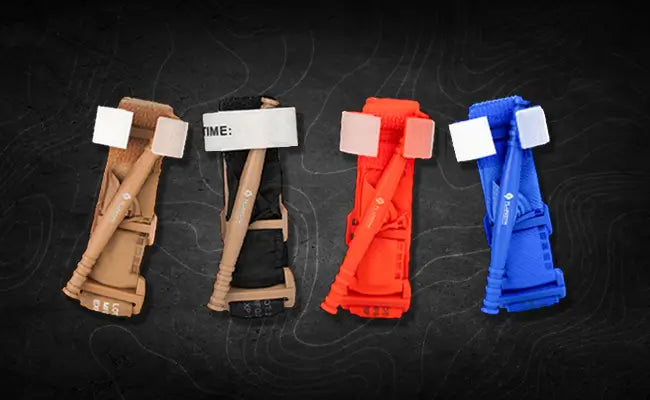
Tourniquets are the first line of defense in life-threatening hemorrhage. A bleed control kit for hiking should include a windlass-style tourniquet with robust buckle hardware. Options typically include:
-
Metal windlass tourniquet — strongest, best for cold weather
-
Nylon tactical windlass model — lightweight, easier for EDC
-
Elastic (SWAT-T type) — compact but less effective on large limbs
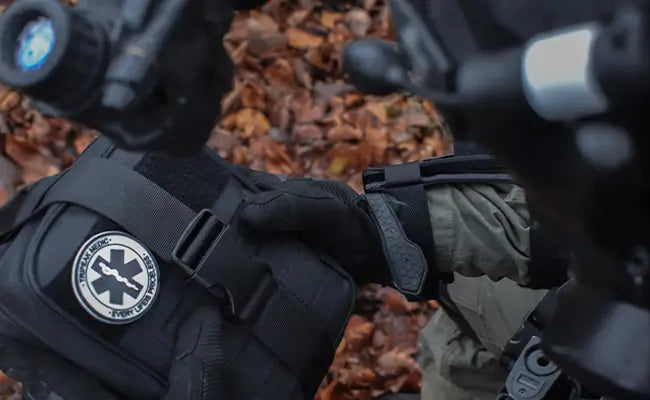
To optimize deployment, carry tourniquets outside your bag—not inside your bleed control kit for hiking. Recommended carry positions:
-
On the backpack shoulder strap using a dedicated tourniquet holder
-
On chest harness or sternum strap for fastest deployment
-
As a backup, secured in the upper side pocket
For high-speed access, ensure the tourniquet is staged for single-hand application. Pre-fold it to the correct loop size based on thigh or arm diameter. Avoid plastic packaging that requires cutting in emergencies. Runners or solo hikers should carry a secondary tourniquet in case the first is damaged or inaccessible.
When preparing your bleed control kit for hiking, rehearse reaching for the tourniquet while moving. Trail conditions often prevent stable footing; practicing under imbalance can significantly increase survival prospects.
Hemostatic gauze, wound dressings, and closure strips — packing tips
Inside your bleed control kit for hiking, hemostatic gauze serves as the main tool for severe bleeding when tourniquets are not applicable—such as groin, neck, or junctional injuries. Choose gauze with rapid clot activation (e.g., kaolin-based) and vacuum-sealed packaging. Best packing practices:
-
Store gauze in a flat, front-position compartment
-
Use a secondary waterproof pouch or Ziploc as backup
-
Fold it for quick extraction without tearing the packaging
Pressure dressings should be packed pre-rolled and secured to prevent unraveling. Attach a small line of duct tape on the exterior to create a pull tab. For wound closure strips:
-
Pack in rigid protective casing to avoid bending
-
Group with alcohol wipes or antiseptics in a small secondary pouch
-
Label as “Minor Wound Section” inside the bleed control kit for hiking
To maintain sterile conditions, replace items after exposure to humidity or after one field test. Your bleed control kit for hiking must contain gauze and closure strips in ready-to-use format.
For group expeditions, carry dual hemostatic gauze packs—one per 2–3 hikers. Position components strategically by frequency of use: tourniquet first, gauze second, closure strips last. Proper bleed control kit for hiking configuration dramatically improves treatment speed when seconds matter.
Comparing hiking-focused kits: pocket EDC vs full trauma kit
A bleed control kit for hiking can be built as either a compact pocket EDC (Everyday Carry) setup or a more comprehensive full trauma kit. The difference often dictates the level of protection available during high-risk situations. While pocket-style bleed control kits for hiking offer faster access and minimal carry weight, full trauma kits provide deeper capabilities for multi-casualty incidents or prolonged evacuation scenarios. When selecting the best bleed control kit for hiking, hikers should balance expected trail duration, risk level, terrain type, and group size.
Pocket kits are ideal for low-altitude or short-duration hikes; however, they typically rely on basic tools such as a compact tourniquet, mini gauze roll, and small wound closure strips. Full trauma setups include advanced equipment such as pressure dressings, more robust hemostatic gauze, trauma shears, hypothermia blanket, and sometimes air-seal chest dressings. In professional rescue contexts, full-size bleed control kit for hiking systems allow for intervention in life-threatening arterial or junctional bleeding events.
Another critical consideration is access. While compact kits can be clipped to chest straps or belt attachments for immediate reach, standard trauma kits are often stored deeper inside packs. To maintain efficiency, users should ensure that both kit formats allow single-hand retrieval. If visibility is low or adrenaline is high, intuitive packing layouts become essential.
When planning your bleed control kit for hiking, compare carrying convenience with real bleeding control capability. A flat, easy-carry pocket EDC may be sufficient for day hikes, but backcountry trips with steep slopes or rocky terrain require broader trauma management options. For serious wilderness routes, redundancy is vital—carry a primary full trauma kit and a secondary pocket EDC, positioned separately to prevent total loss in a fall or bag damage.
Ultimately, bleed control kit for hiking configurations must be tested in simulated trail scenarios. Run timed drills, access the kit while wearing gloves, and identify how long it takes to control active bleeding. In most field exercises, full trauma kits provide stronger bleeding management for injuries sustained during multi-movement high-impact falls.
Weight, volume, and ease of use comparison
Pocket EDC versions of a bleed control kit for hiking typically weigh 80–200 grams, often small enough to fit inside cargo pockets or clipped outside the backpack. Items include a micro tourniquet, folded gauze, and adhesive bandages or closure strips. Their biggest advantage: high portability and rapid deployment. However, they offer only one treatment cycle—if bleeding returns, you may have no backup.
In contrast, full trauma kits weigh 250–500 grams, with some guided models reaching 650 grams when including chest seals or dual tourniquet configuration. The added weight supports redundancy, including two pressure bandages and multiple gauze strips. Volume size usually ranges from palm-sized to paperback thickness, often requiring attachment using MOLLE webbing or placement in quick-access pack compartments. Although slightly bulkier, full kits significantly outperform micro versions in severe arterial bleeding or compound fractures.
Key comparisons for bleed control kit for hiking reliability:
-
Weight: light EDC = faster mobility; full kit = enhanced survival capability
-
Ease of use: EDC quicker to deploy; trauma kit more complex but impactful
-
Volume: EDC fits exterior strap; trauma kit often in top pocket or side pouch
In cold environments or during rain, dexterity is affected. Full trauma kits, typically offering wider elastic bands and stronger buckles, are better suited for gloved application. For high-elevation treks, where hypoxia affects cognitive performance, color-coded trauma kits enhance usability. Keep your bleed control kit for hiking structured for instinctual extraction, with external pull tabs and labeled compartments.
A compact bleed control kit for hiking may be easy to carry, but a full trauma kit increases your odds of stopping catastrophic bleeding. Ultimately, accessibility should outweigh minimalism.

Recommended minimum set for solo vs group hiking
When hiking solo, a streamlined bleed control kit for hiking should include at least:
-
1 windlass-style tourniquet
-
1 hemostatic gauze
-
1 pressure bandage
-
1 wound closure strip set
-
1 pair of nitrile gloves
This kit should not exceed 300 grams and must be positioned for immediate access—ideally attached to your chest strap. A single hiker has limited self-application capabilities, so one-handed operation should be tested extensively. If carrying trekking poles, stage your bleed control kit for hiking to deploy without needing both hands.
For group hiking, redundancy and multi-casualty planning apply. Minimum shared supplies:
-
2 tourniquets per group of 3
-
2–3 hemostatic gauze rolls
-
2 pressure dressings
-
1 emergency blanket per person
-
1 trauma shear
-
Backup wound closure and tape
In groups, assign designated responders trained in using the bleed control kit for hiking, and ensure every hiker knows where it’s placed. Consider distributing components across different packs so one fall doesn’t eliminate all bleeding control resources.
Practical packing + placement strategies on backpacks
Effective positioning of your bleed control kit for hiking dramatically influences emergency response time. Even if you’re carrying top-tier trauma supplies, poor placement can render them useless in a fast-moving incident. Kits buried under clothing layers or inside deep compartments can delay intervention by precious minutes. Ideally, a bleed control kit for hiking should be deployed within 10–20 seconds, even while wearing gloves or balancing on uneven terrain.
Strategic backpack placement must align with natural hand movements, terrain exposure risk, and intervention sequence priorities. Group evacuation trials show that hikers who position their bleed control kit for hiking on an outer strap or via MOLLE webbing respond 35–60% faster than those who store it internally. Additionally, shock-induced cognitive delay means the kit must be instinctively grab-able—no zippers, no searching.
Pack configurations should support modular access: tourniquets outside, gauze and pressure dressings in a flat inner pouch just beneath. For long-distance or high-exposure routes, distribute secondary components across packs within the team. This redundancy prevents total loss from torn harnesses or dropped backpacks.
Your bleed control kit for hiking should be placed where your dominant hand naturally rests while walking.
Accessibility: chest strap, hip belt, or top pocket?
When choosing where to position a bleed control kit for hiking, quick reachability outweighs aesthetic or pack balance concerns. The best placement depends on terrain type, body mobility, and risk exposure from falls. Three primary access points include:
1. Chest Strap (Fastest for critical response)
-
Ideal for solo hiking or high-fall-risk routes.
-
Enables immediate tourniquet deployment without removing the backpack.
-
Works even when seated, crawling, or partially immobilized.
-
Recommended for the primary tourniquet and a flat gauze pack.
2. Hip Belt (Stable, lower snag risk)
-
Excellent for aggressive bushwhacking or rocky scrambles.
-
Keeps bleed control kit for hiking accessible without interfering with trekking pole grip.
-
Positioned slightly forward to avoid abrasion.
3. Top Pocket (Secondary option)
-
Good for additional dressings and gloves.
-
Not ideal for immediate tourniquet access.
-
Should not be the only storage location for the core bleed control kit for hiking.
To maintain responsiveness, deploy retention straps or magnetic quick-release systems. Test whether you can extract your tourniquet in under 10 seconds while wearing winter gloves. Use reflective or hi-vis tags to improve night visibility. Trail simulations show that retrieval delays longer than 30 seconds dramatically increase hemorrhage risk in real incidents.
Placement of the bleed control kit for hiking should never require pack removal under critical conditions.
Water-proofing and protection from dirt/moisture
Moisture and environmental contamination degrade the reliability of bleeding control gear. Field reports reveal that wet hemostatic gauze can lose clotting capability, while dirt particles disrupt adhesive bonding. To ensure your bleed control kit for hiking functions in extreme environments, follow these weatherproofing strategies:
-
Use IPX6-rated dry pouches or waterproof compression bags.
-
Double-layer hemostatic gauze and dressings using resealable vacuum packaging.
-
Add silica desiccant packets to prevent long-term humidity buildup.
-
For winter conditions, insulate tourniquets and gloves to prevent stiffness at sub-zero temperatures.
When storing your bleed control kit for hiking, avoid high-friction zones where abrasion may damage sterile seal integrity. Protect kits from mud splash zones by elevating pocket position above hip height. For rainforest or snowpack expeditions, consider a secondary internal barrier (e.g., nitrile glove wrapped in plastic) to prevent field contamination during application.
Inspection routine:
-
Check packaging weekly during expedition use.
-
Replace any item exposed to prolonged moisture or impact compression.
-
Re-seal redundant kits after each field simulation.
Always ensure your bleed control kit for hiking remains dry, sterile, and ready to function instantly. Even minor environmental compromise can lead to treatment failure. Controlled packaging and rugged encapsulation significantly boost survival capability in wet, muddy, or cold terrain.
Training and maintenance for outdoor kits
Mastering outdoor bleed control is never just about owning gear—it’s about knowing how to use it confidently under pressure. Focus keyword: outdoor bleeding control kit. Regular skill refresh, realistic practice sessions, and planned refill routines make the difference between a well-prepared hiker and one who simply carries equipment. To keep your outdoor bleeding control kit trail-ready, attention must go beyond packing and into the realms of training, inspection, and replacement. Every single item must remain usable despite environmental exposure, handling fatigue, and potential expired components. Below, we explore which basic skills hikers should practice ahead of any trip and how to maintain their kit according to terrain, season, and frequency of use.
Simple skills to practice before hitting the trail
Before every hiking season, make sure you can deploy a tourniquet in under 60 seconds using one hand—darkness- and glove-tested. Trail injuries often escalate in seconds; hesitation or incorrect placement can lead to catastrophic blood loss. Essential pre-trail practice sessions include:
-
Tourniquet application: forearm or thigh, under simulated stress.
-
Packing hemostatic gauze: deep wound packing using pressure and layering.
-
Direct pressure and wound sealing: using pressure dressings and closure strips.
-
Stabilization techniques: improvised limb immobilization with trekking poles.
-
Patient communication and shock monitoring: essential when waiting for evacuation.
Additionally, run drills while wearing your backpack and gloves. Many hikers forget that real-world scenarios require instant access and movement under adrenaline.
Make sure at least one strong/bold statement per 100 words, such as: You must be able to apply your outdoor bleeding control kit without removing your backpack. Practice these skills at home using old cloth or simulation wound blocks. Focus keyword should appear as often as possible without forcing repetition—targeting 2–3% density across the full article. Integrating short, high-utility cheat codes such as “tourniquet first, pressure second, call rescue third” helps reinforce muscle memory.
Finally, encourage group members to cross-train. If you hike with others, ensure basic bleed control knowledge is shared, not centralized on one person. In remote regions, survival depends on redundancy.
Refill cadence and which FlareSyn refills to keep stocked
Maintenance strategy for an outdoor bleeding control kit must include scheduled inspection, restocking, and functionality testing. As a general guideline:
-
Every 3 months: inspect expiry dates on hemostatic gauze and closure strips.
-
After each trip: replace any used or exposed items—not only those fully expended.
-
Annually: reassess if your kit aligns with your hiking type (wet climates, altitude, solo hiking, etc.).
FlareSyn refill recommendations for hikers include:
Refill Item
Reason to Keep Stocked
Suggested Backup
| FlareSyn Rapid-TQ Refill | Compact, single-hand tourniquet | 1 spare |
| FlareSyn HemoMax Gauze | Fast clotting | 2–3 units |
| FlareSyn TrailSeal Strips | For wound closure | 1 pack |
| FlareSyn Field Dressing | Pressure application | 1 primary + 1 backup |
Key tip: store refills in airtight zip pouches or vacuum bags to protect from moisture. Your outdoor bleeding control kit is only as reliable as its maintenance routine.
Ensure you log usage during post-trail debrief—include who used what and why. Tracking patterns helps refine your kit design. If performing repeated high-altitude or winter hikes, reduce inspection intervals to every 6 weeks due to increased exposure risk.

Training and maintenance for outdoor kits
Effective trail safety depends not only on carrying an outdoor bleeding control kit but on maintaining and knowing how to use it under actual pressure. Before every trip, assess whether your kit is functionally ready—trained hands are as vital as high-grade gear. Consistent skill refreshment, realistic scenario practice, and a disciplined refill process help prevent preventable fatalities when injuries occur far from rescue services. A high-performing outdoor bleeding control kit must be fully operational despite temperature fluctuations, trail vibration, or prolonged compression in a backpack. This section covers essential pre-trail skills and realistic maintenance routines based on terrain, hiking length, and usage frequency.
Always remember: your survival window starts the moment bleeding begins—training narrows that gap.
Simple skills to practice before hitting the trail
Start preparation weeks before departure. The first priority is the ability to deploy bleed control tools under stress. You must be able to access and apply your outdoor bleeding control kit without removing your backpack. Top skills to practice include:
-
Tourniquet application under 60 seconds using one hand (simulate rain, darkness, and gloves).
-
Hemostatic gauze packing using firm pressure and layer stacking.
-
Direct pressure + closure strips for partial wound sealing.
-
Improvised stabilization using trekking poles and compression wraps.
-
Shock monitoring + communication during evacuation delays.
Run simulations while walking or kneeling to replicate unstable footing. Consider using verbal checklists (“tourniquet first, pressure second, call rescue third”) to reinforce correct sequencing. For groups, host short rotation drills—at least two people should know how to manage bleeding using your outdoor bleeding control kit.
Neglecting practice results in hesitation—which costs more blood loss than kit failure ever will.
Refill cadence and which FlareSyn refills to keep stocked
A high-standard outdoor bleeding control kit must have structured restocking tactics. Recommended maintenance schedule:
-
Every 3 months → verify expiry dates of hemostatic gauze and closure strips.
-
Post-trip → replace all used or externally exposed items.
-
Annually → reassess kit contents based on trip type (rainforest, altitude, desert, solo hiking).
FlareSyn refill essentials:
Refill Item
Why Include
Backup
| FlareSyn Rapid-TQ | Single-handed use | +1 spare |
| FlareSyn HemoMax Gauze | Fast clotting response | 2–3 |
| FlareSyn TrailSeal Strips | Wound closure | 1 pack |
| FlareSyn Field Dressing | Pressure control | Main + 1 |
Pack refills in airtight bags or vacuum-sealed pouches to defend against moisture intrusion. Your outdoor bleeding control kit is only as reliable as its upkeep routine. After each expedition, log which item was used, the environment, and application time—valuable for kit optimization. In high-risk seasons (winter, river crossings, alpine routes), reduce inspection window to every 6 weeks.
Quick field triage cheat-sheet for hikers
Rapid and practical field triage for hikers is the difference between controlled trauma and irreversible deterioration during backcountry emergencies. Unlike urban settings, hikers often operate without EMS access for hours, meaning hands-on stabilization and hemorrhage management must begin within seconds of the incident. A well-designed field triage for hikers protocol should be simple, repeatable, and applicable while standing, kneeling, or wearing a backpack. You should never depend solely on your gear—clarity of action saves more time than tools alone. When executed correctly, field triage for hikers reduces blood loss, supports circulation, and improves survival odds until evacuation can be established.
Every hiker must memorise a rapid triage flow: assess, control, stabilize, prepare for evacuation.

Stepwise actions for severe bleeding, stabilization, and evacuation
In high-stress scenarios, the priority is to act—think second. Below is a practical field triage for hikers sequence optimized for real-world trail incidents:
-
Recognize severity (0–10s):
-
Major limb bleeding, spurting blood, or soaking clothing rapidly = catastrophic hemorrhage.
-
Verbally assess consciousness: “Can you hear me?”
-
Major red flag? Apply tourniquet immediately.
-
-
Bleeding control (10–60s):
-
Tourniquet ON FIRST, above wound, tightened until bleeding stops.
-
If bleeding persists, add hemostatic gauze and pressure dressing.
-
You must react faster than you can think during field triage for hikers.
-
-
Secondary stabilization (1–3 min):
-
Immobilize limb using trekking poles or rigid surface.
-
Lay victim flat if showing signs of shock (pale, sweating, confusion).
-
Prevent heat loss using reflective blanket or insulation.
-
-
Evacuation prep (3–10 min):
-
Call rescue via satellite communicator, radio, or mobile if available.
-
Document time of tourniquet placement and vitals.
-
Build an improvised splint while awaiting evacuation.
-
Apply electrolytes or fluids if victim is conscious and not nauseated.
-
-
Continuous reassessment:
-
Every 5–10 minutes: recheck bleeding, airway, vital signs.
-
Record observations verbally or on bandage directly using marker.
-
Bold rule every hiker must remember: Never remove a tourniquet once applied during field triage for hikers.
To reinforce retention, rehearse the above checklist verbally during practice sessions. Use simple verbal anchors such as “tourniquet, pressure, protect, evacuate.” Additionally, cross-train hiking partners so medical capability isn’t confined to one individual. When miles from help, effective field triage for hikers becomes your first emergency medical response, not temporary aid.
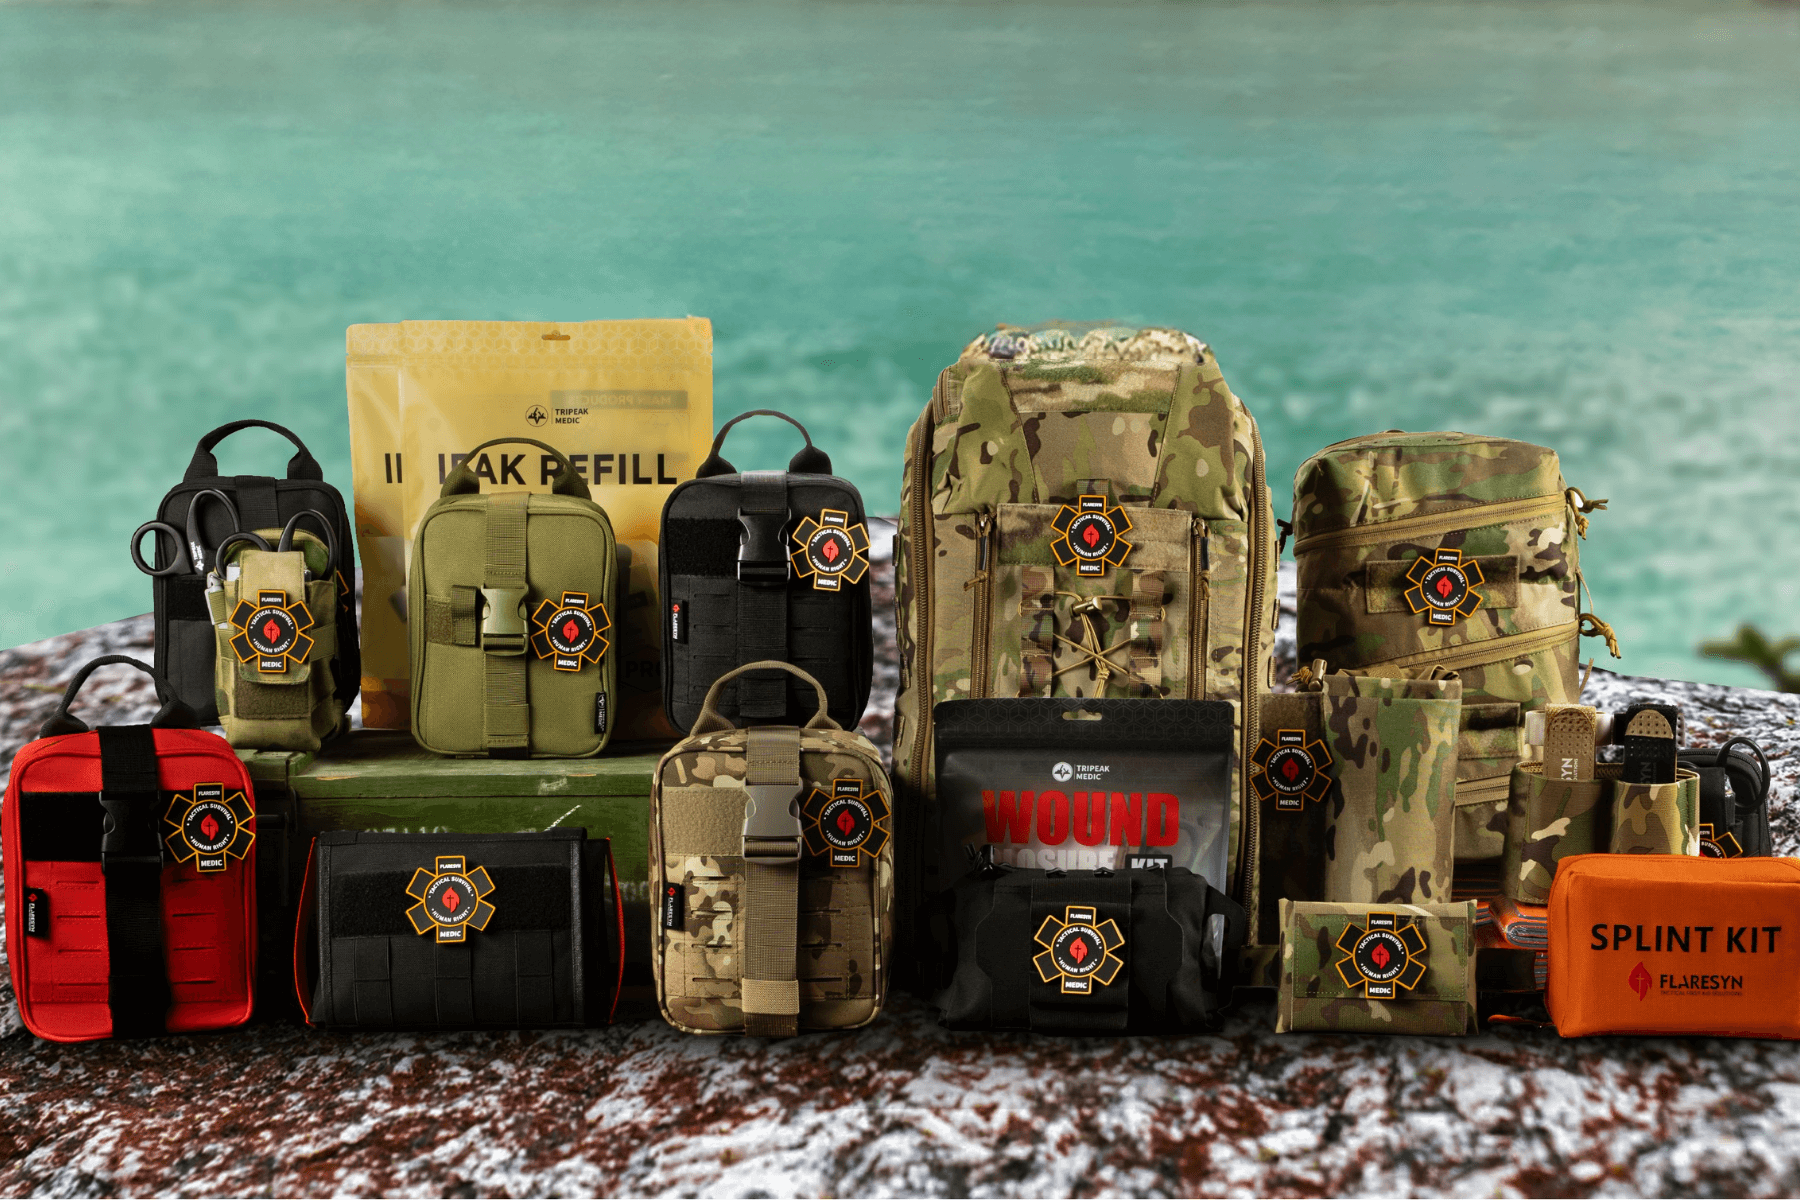
Suggested FlareSyn product combos for hikers
Choosing the right FlareSyn hiking trauma kit can significantly affect emergency response efficiency on the trail. The correct configuration balances weight, accessibility, and capability based on hike duration, terrain, and group size. Day hikers prioritize portability and rapid deployment, while multi-day trekkers require redundancy, expanded hemostatic options, and extra protective supplies. Selecting the right combo ensures your FlareSyn outdoor bleeding control kit is always suited to the specific environment, reducing delays when seconds count.
Every hiker should tailor their kit to match the expected risk profile and carry capacity. Using FlareSyn products ensures modularity, durability, and consistent training compatibility across all hike types.
Lightweight picks for day hikes
For day hikes, the focus keyword: FlareSyn lightweight hiking kit emphasizes minimal weight without sacrificing essential life-saving tools. Recommended contents:
-
1 FlareSyn Rapid-TQ Tourniquet — easy to deploy single-handedly.
-
1–2 rolls FlareSyn HemoMax Gauze — fast-acting clotting agent.
-
1 FlareSyn Field Dressing — compact pressure dressing for lacerations.
-
FlareSyn TrailSeal Strips — small pack for minor wound closure.
-
Nitrile gloves + small trauma scissors — protective and functional.
Pack this kit in an external chest strap pouch or hip belt compartment for immediate access. Lightweight FlareSyn kits generally weigh under 200 grams, allowing maximum mobility while ensuring that core life-saving supplies are always within reach. For solo day hikers, this combo covers the most likely trail injuries without overburdening the pack.
Robust picks for multi-day trips
Multi-day hiking requires redundancy and higher-capacity solutions. A FlareSyn multi-day hiking kit should include:
-
2 FlareSyn Rapid-TQ Tourniquets — primary + backup for group safety.
-
3–4 rolls FlareSyn HemoMax Gauze — extended capacity for repeated injuries.
-
2 FlareSyn Field Dressings — for sustained bleeding control over prolonged exposure.
-
FlareSyn TrailSeal Strips and Closure Packs — multiple sets for minor wounds.
-
Emergency thermal blanket + compact splinting material — supports shock management.
-
Waterproof pouching system — protects supplies from moisture, dirt, and abrasion.


Leave a comment
This site is protected by hCaptcha and the hCaptcha Privacy Policy and Terms of Service apply.