How to Use a Belt as a Tourniquet: What You Need to Know

how to use a belt as a tourniquet

Stopping heavy bleeding fast can save a life, especially during emergencies where medical help is delayed or professional equipment is not nearby. Some situations happen during road accidents, active outdoor environments, construction sites, or remote travel where someone may bleed heavily before help arrives. In these moments, people often try to improvise using what they have, including a belt. 

While a belt can sometimes slow down severe bleeding, it is less effective than a certified tourniquet because belts lack mechanical tightening and correct width. Understanding how to use a belt safely, along with its limits, helps prevent mistakes that could make injuries worse. A purpose-built tourniquet like those found in trauma kits from FlareSyn should always be your first choice, but knowing how to improvise is still useful if no proper tool is available.

When, Why & How Belts Become Makeshift Tourniquets

People use belts as improvised tourniquets when someone experiences life-threatening bleeding and no proper medical tools are nearby. This includes motorcycle crashes, hunting accidents, industrial injuries, or natural disasters where limbs may be cut, punctured, or severely damaged. A tourniquet works by stopping blood flow above the wound, buying time until medical professionals take over. Belts are common because they are thick, available, and can wrap around a limb quickly.

However, belts struggle to tighten enough to stop arterial bleeding and can slip easily. The phrase “improvised tourniquet” refers to anything used as a substitute when standard tourniquets are unavailable, but this should always be a last resort. Using a belt incorrectly can cause tissue damage or fail to stop bleeding, so understanding the risks is important before attempting this method.

What a Proper Tourniquet Does

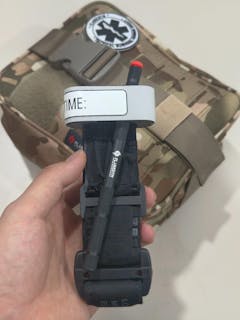
A proper tourniquet stops blood flow from a major artery by applying strong, controlled pressure above the wound. This prevents blood loss long enough for the injured person to reach medical care. A commercial tourniquet uses a windlass or mechanical tightening bar that increases pressure evenly and locks into place. This design reduces the chance of slipping, loosening, or uneven compression, which can happen with belts.

Proper tourniquets also have the right width to minimize unnecessary tissue damage while still restricting circulation effectively. Medical training organizations emphasize that stopping heavy bleeding requires more force than most people expect, and improvised solutions often fail to apply enough pressure. While belts can help slow bleeding temporarily, they rarely match the performance of professionally designed devices, which is why carrying a real tourniquet is the safer option.

When a Belt Might Be Considered

Using a belt as a tourniquet should happen only if no certified tourniquet is accessible and the situation is life-threatening. Examples include hiking accidents where you left your trauma kit at camp, vehicle collisions where you only have roadside supplies, or unexpected incidents in public spaces. The belt must be applied above the wound and tightened enough to significantly reduce blood flow. If bleeding continues after tightening, elevation, and wound packing, the belt may not be sufficient.

In these cases, prioritize getting a proper tourniquet as fast as possible. Carrying trauma gear like compact IFAKs from FlareSyn prevents relying on improvised materials. Belts are a temporary measure, not a replacement for real medical tools, and should never be relied on as your main option in high-risk environments.

Step-by-Step Guide: Using a Belt as a Tourniquet

If you must use a belt, the process needs urgency and clear steps. The goal is to reduce blood flow above the damaged area until professional care is available. The belt should be placed between the wound and the heart, tightened firmly, and secured in a stable position. You should also monitor the patient, note the time, and never remove the belt until trained medical staff take over.

These steps improve the chance of keeping the person alive during transport. Even though this guide shows how to attempt improvisation, remember that a belt is less effective than proper equipment, and failure is possible. This method is meant for extreme situations, not regular first-aid planning.

Step 1: Identify the Injury and Location

Before applying any tourniquet, confirm the injury is severe enough to need one. Tourniquets are used when blood loss is rapid, pulsing, or coming from a serious limb injury such as a deep cut, crushed limb, or gunshot wound. Check that the bleeding does not stop with direct pressure or compression. Once confirmed, locate a spot above the wound, ideally two to three inches from the injury and away from joints.

Applying a belt on a joint reduces pressure effectiveness. If clothing covers the wound, expose the area to understand severity and check injury patterns. Make sure the person remains calm and supported because panic increases heart rate, causing faster blood loss.

Step 2: Selecting and Preparing the Belt

Choose a belt that is wide, strong, and has no elasticity. Stretchy belts, thin belts, or belts with delicate material will not tighten enough and may snap. Leather belts are useful because they hold resistance, while many fabric belts slide or loosen once movement begins. Remove the belt quickly and flatten it to avoid twists before applying.

If the buckle isn’t secure enough to lock under tension, you may need to tie a knot or use a tool like a stick or wrench to twist the belt. This twisting method imitates a windlass, which commercial tourniquets like those found in FlareSyn kits use to tighten more effectively. The belt must fit snugly against the limb, not over bulky clothing if possible.

Step 3: Applying the Belt Correctly (Placement & Tightening)

Wrap the belt above the injury and pull tightly before securing. The belt should tighten enough to stop arterial blood flow, which may require significant force. Simply tightening until it is uncomfortable is not enough; it must restrict circulation. If the buckle cannot apply enough tension by itself, insert a rigid object such as a rod, screwdriver, or stick between the belt and limb, then twist until bleeding slows or stops.

Secure the twisting tool so it does not unwind. If blood continues to flow, reposition higher on the limb or tighten further. Avoid placing the belt directly over joints like elbows or knees because pressure will not distribute properly. Monitor the limb to ensure circulation is restored.

Step 4: Marking Time, Seeking Medical Help & Monitoring

Once the belt is secured, note the exact time of application. Tourniquets should remain on until medical professionals take over because loosening them can cause sudden blood loss. Most medical guidelines advise keeping a tourniquet on only for a limited period before tissue damage becomes likely, which is why recording the time helps emergency teams respond correctly.

Keep checking the belt to ensure it doesn’t loosen and watch for signs of shock, such as pale skin, confusion, or rapid breathing. Call emergency services or transport the person to medical care immediately. A belt can slow bleeding temporarily, but trained professionals must take over as soon as possible.

Limitations, Risks & Better Alternatives

Belts can fail as tourniquets for many reasons, including poor tightening, narrow width, and slipping during movement. They lack built-in windlass systems, which are essential for high tension. A belt may reduce bleeding rather than fully stopping it, which increases the risk of continued blood loss. Another concern is tissue damage if the belt applies pressure unevenly or digs into skin.

In situations where a limb is severely damaged, partial pressure can make bleeding worse rather than controlling it. These issues are why medical training groups recommend proper tourniquets instead. Commercial tools reduce guesswork and increase survival chances, making improvised methods a backup plan instead of the main response.

When You Should Use a Commercial Tourniquet Instead

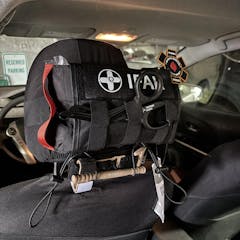
A commercial tourniquet should be used whenever one is available, even if a belt is nearby. Professional devices are built specifically to stop arterial bleeding with less effort and more reliability. They allow a person with limited strength or training to apply strong pressure and maintain it during movement or transport. In situations like range training, combat zones, vehicle carry, or emergency response work, a commercial tourniquet provides a safer margin of error because it stays locked in place and applies consistent pressure.

Belts are a backup option, not a primary tool, and should only be used when circumstances leave no other choice. Keeping a commercial tourniquet in a backpack, vehicle, or personal first aid kit prevents relying on improvised gear during a life-threatening emergency.

What Features a Certified Tourniquet Has

A certified tourniquet includes features designed to control bleeding quickly and safely without constant adjustment. The most important feature is a windlass or mechanical tightening system that increases pressure beyond what hands or a belt buckle can produce. The strap is usually one to two inches wide, which helps restrict circulation without causing unnecessary tissue injury.

A locking mechanism prevents release while the person moves, and many models include a time marker so responders know when it was applied. Materials used in commercial tourniquets resist tearing, moisture, and extreme temperature changes. These features work together to deliver strong, controlled compression, which is why trained responders depend on them instead of improvised items.

Recommended Tourniquet Options for Home, Vehicle & Tactical Kits

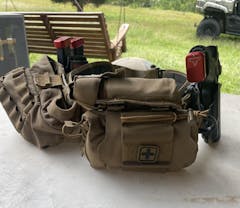
Different environments require different types of tourniquets. A compact model fits into a personal kit for hiking or daily carry, while a stronger model may be stored in a vehicle or range bag. For tactical setups or plate carriers, low-profile designs with stronger windlass systems are preferred because they can be mounted externally and accessed quickly.

FlareSyn offers trauma kits that include tourniquet options suitable for personal use or tactical carry, such as their compact IFAK and advanced kits built for emergency scenarios. Having a tourniquet in multiple locations, home, work, range, vehicle, ensures that someone nearby can respond without delay.

Integrating Tourniquet Use into Your Trauma Kit

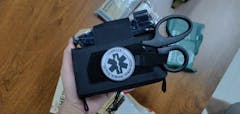
Trauma kits should focus on tools that manage severe bleeding since uncontrolled blood loss can become fatal within minutes. Including a tourniquet in your kit provides a first response option for major injuries like cuts from machinery, gunshot wounds, or severe accidents. A tourniquet should be paired with other bleeding control items such as pressure bandages, hemostatic gauze, and chest seals.

If you carry a compact kit like an IFAK, place the tourniquet on the outside or in a visible pocket so it can be reached quickly under stress. Larger kits used for family or team use can store multiple tourniquets to handle more than one injury at once. Kits sold by FlareSyn follow this layout approach, offering modular storage that keeps vital tools accessible during emergencies.

Frequently Asked Questions (FAQs)

Can I really use a belt as a tourniquet?

You can attempt to use a belt if no proper tourniquet is available, but it should be viewed as a last resort. A belt may slow bleeding but often struggles to stop arterial flow entirely. A certified tourniquet is a safer and more effective option.

How tight should the belt be?

It must be tight enough to restrict circulation above the wound, not just tight enough to cause discomfort. If bleeding continues after tightening, it needs more pressure or a better solution.

How long can it stay on?

A belt should stay on only until trained help arrives. The longer it stays, the higher the risk of tissue damage, which is why time tracking is important.

What if bleeding continues after the belt?

Move the belt higher on the limb, tighten further, or apply wound packing with pressure. If possible, switch to a certified tourniquet.

Should every vehicle kit have a tourniquet?

Yes, especially in areas where response time is slow or accidents are common. Vehicle trauma kits benefit from having multiple bleeding control tools, including real tourniquets instead of relying on improvised methods.

Conclusion: Be Prepared, Use Proper Tools & Know the Limits

A belt may help slow heavy bleeding when nothing else is available, but it should never replace proper medical tools or training. Serious injuries require fast action, and improvised solutions leave more room for failure. Carrying a certified tourniquet in a personal kit, vehicle, workplace bag, or tactical setup creates a safer and more reliable plan. The goal is not to depend on improvisation but to avoid situations where improvisation becomes the only choice.

If you regularly work, travel, or train in environments with higher injury risks, investing in trauma gear ensures you are ready to respond when seconds matter. Tools like trauma kits from FlareSyn provide practical options so you can stay prepared instead of hoping gear is available later.

ARTICLES CONNEXES